Monday, 13 July 2009

Using Google Reader's Stars

I like to access my Google Reader from lots of different places - school, home, flat, dad's laptop. It's great, but sometimes I want to remember a post, or read it when I have more time. So I've started to use the stars...

By making my starred items public, I can now subscribe to this page's RSS feed using Thunderbird - my mail client at home. So, any item I star will be delivered straight to my home computer so I can read it at my leisure. Obviously, it will still be stared on Google Reader too in case I want to read it somewhere else.

The other benefit is that other people can subscribe to the items that really catch my attention!

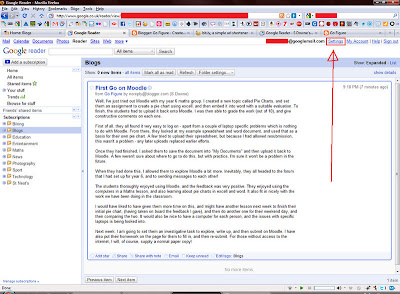
To make your starred items public, click on settings at the top of Google Reader:


1) Go to the Folders and Tags tab

2) Click on the funny quarter-circle symbol thingy next to starred items. This makes it public, (note: to make it private again, just click on the funny quarter-circle symbol again!).

3) Now, you can visit your starred items page as if it were a normal blog.


And here's what you get:


You can now grab the RSS feed link and import it into Microsoft Outlook (my work) or Thunderbird (my home) or share it with friends. This also works for any other folder in Google Reader you might wish to share.

Supalogo!

This I've been trying out Supalogo, a new tool which quickly and easily generates text to embed in a website or blog, or download for use on your computer. Here's one I've done:


If you visit the site, you can type in some text, and then click generate. It gives you the option to change the colour, style, or pattern.

To embed in Moodle, don't forget to click on the < > button above the text input box.


Thanks to Mr Byrne at Free Technology for Teachers for the heads up!

Swapping Places

So, if I had 100 red counters and 100 blue counters, placed alternately on a table, what is the least number of adjacent swaps that I would have to do so that I had all the reds on one side and all the blues on the other?

Year 6 answered this question, and by doing so found out that the answer had a definite link to Triangular Numbers! Using Moodle, I uploaded a instruction document detailing the students about the task, and then allowed them to use Word and Excell to create an investigation report. Included in my document was a marking criteria, based on the school's WAC grading.

Firstly, doing the investigation in ICT2 during the hottest time of the year was maybe not the best plan.

After the first lesson, they uploaded their (unfinished) documents to Moodle so I could look at them, and give them feeback or ideas to extend their investigation. They then had one final lesson to finish off, using the pointers I had given them.

Chat was used extensively as a feedback tool, for further advice, and for a break from the work. They enjoyed this part of Moodle, but it should be made clear that chat is okay as long as the work is being done. Specific time criteria or goals could be given. Chat also lets everyone have an opinion, if they are willing to give it, (compare to whole class discussion situation, when only one person should be speaking at a time).

The main successes of this task were:

1. The use of ICT in a Maths project; being able to generate a mathematical formula in Excell is not only a worthwhile exercise in computer programming, but also in Mathematical thinking and logical thought processes.
2. They were very involved in the task, and were able to find out about Triangular Numbers on the internet from a variety of sources
3. They were keen to do well; providing a marking criteria online that they could constantly check was very beneficial.
4. The online feedback was very easy and efficient - being able to see their word documents on screen was incredibly easy!
5. They had fun, and enjoyed a Maths lesson using computers and doing something different
6. Progress was easy to identify based on teacher input and student reflection, based on the comparison between intial submission and final submission
7. The students have obviously, after only 2 attempts, gotten used to submitting pieces of work through Moodle.
8. There was no paper involved at any time - good for the environment and for keeping my desk clear!

However, there are things I might have done differently:

1. Allowed a bit more time in the classroom for planning, group discussion, and teacher input
2. Given a stricter time limit - some investigations were still unfinished
3. Stressed the importance of content over aesthetics - too many individuals thought that making their document look good was more important than what they actually wrote
4. Have one computer per child, or at least select those who would work together. I believe that more computers are going to be installed into the ICT2 room which will help
5. Allowed them the opportunity to see each others work, to share comments, and to feedback on each others work. Possibly to mark each other's work - this is something which will need some thought!

I really enjoyed working with year 6 on this project, and I believe that they got a lot out of it in lots of different areas.
First Go on Moodle

Well, I've just tried out Moodle with my year 6 maths group. I created a new topic called Pie Charts, and set them an assignment to create a pie chart using excell, and then embed it into word with a suitable evaluation. To finish, the students had to upload it back onto Moodle. I was then able to grade the work (out of 10), and give constructive comments on each one.

First of all, they all found it very easy to log on - apart from a couple of laptop specific problems which is nothing to do with Moodle. From there, they looked at my example spreadsheet and word document, and used that as a basis for their own pie chart. A few tried to upload their spreadsheet, but because I had allowed resubmission, this wasn't a problem - any later uploads replaced earlier efforts.

Once they had finished, I asked them to save the document into "My Documents" and then upload it back to Moodle. A few weren't sure about where to go to do this, but with practice, I'm sure it won't be a problem in the future.

When they had done this, I allowed them to explore Moodle a bit more. Inevitably, they all headed to the forum that I had set up for year 6, and to sending messages to each other!

The students thoroughly enjoyed using Moodle, and the feedback was very positive. They enjoyed using the computers in a Maths lesson, and also learning about pie charts in excell and word. It also fit in nicely with the work we have been doing in the classroom.

I would have liked to have given them more time on this, and might have another lesson next week to finish their initial pie chart, (having taken on board the feedback I gave), and then do another one for their weekend day, and then comparing the two. It would also be nice to have a computer for each person, and the issues with specific laptops is being looked into.

Next week, I am going to set them an investigative task to explore, write up, and then submit on Moodle. I have also put their homework on the page for them to fill in, and then re-submit. For those without access to the internet, I will, of course, supply a normal paper copy!

Saturday, 13 December 2008

Using Flickr with the School Webpage

Recently, I was offered the option of taking over the school website. I accepted, (eventually), and started thinking about what I was going to do with it. The old one is still live and you can see it HERE.

One of the things I wanted to improve was how pictures were displayed on the site. The pictures on the old site were out of date, and difficult to change, so I signed up for Flickr and started uploading! By tagging my photos, I was able to incorporate them into my pages as a slideshow, (which will automatically update when new pictures are tagged). For example, have a look at the art page.

I then discovered a wonderful application which uses Flickr tags to generate a wall of pictures - like a gallery. Take a look at the year 7 art one HERE. Again, it will automatically update when new pictures are tagged.

The other thing I was concerned about was photos of the children being put on Flickr. I decided not to go do this route, and instead still host them on the school server. However, tiltviewer can be set up to use these pictures - for example look at the recent pictures from the boarders ice skating trip.

This is not automatically updated, but using Picasa I can rename any number of pictures, and then copy them into the appropriate folder on the server. Easy.

I hope that these two methods of sharing photos of work and school will enable viewers of the site to get a real picture of St Neot's school, while making my new job as website administrator a lot easier!

Saturday, 1 November 2008

What's Up, Google Docs? Forms are!

I've been using Google Docs for quite a while now, but since I've been using Google Sites for my Maths website, I've found myself using them more and more for embedding documents and slide shows. My latest experiment is with forms - getting visitors to the website to input data, and then have it stored online in a spreadsheet.

Firstly, I tried it out with a newsletter sign up page, and I've had a few e-mail addresses. Now, I made a new form for this weeks puzzle:

Visitors to my site can now input their answers start into the web page - and I get a nice list of replies in a downloadable spreadsheet!
They are embeddable in other blogs and websites too:


For lots more ideas on how to use Google Forms, follow the link HERE.

Thursday, 30 October 2008

Using Twitter in Facebook

Following the Twitter-craze at the IoW conference, I decided to do my bit and explain how I am using Twitter, Twitterfeed and Twhirl to automatically send updates to my Facebook status. This means that I can update my status from my desktop application, and my friends are automatically notified when I publish a new blog post. In fact, after writing this post now, people on Facebook will be able to see it within the hour. Hopefully!

First of all, you need to download and install Twhirl which will run from your desktop. As you can see here, I have added an update by typing into the input box:
Next, you need to install the Twitter Facebook application, which will give you an option to automatically update your status:


Now, from Twhirl, you can update two things at once! With the power of Twitterfeed, you can also automatically post new blog titles to your Facebook status!


A time saver, and also a great way to let friends know when you have blogged!

And here is the update appearing the the Facebook feed: